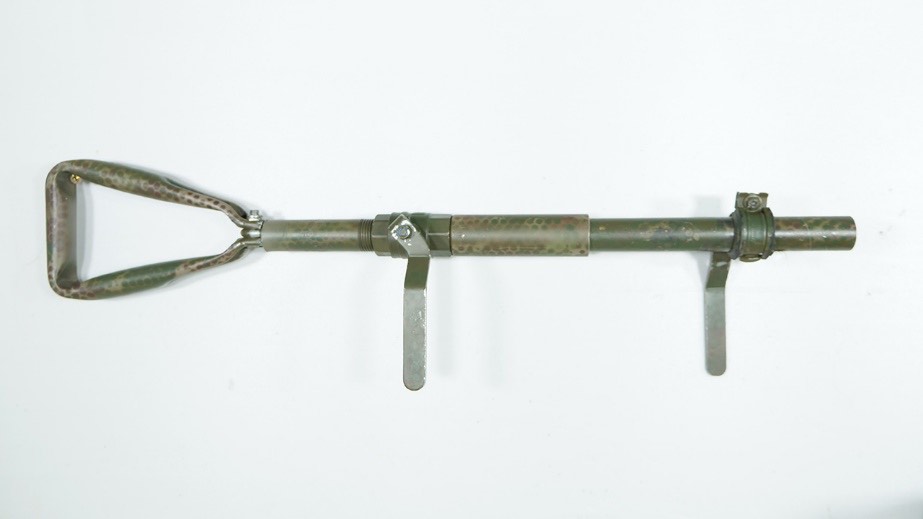

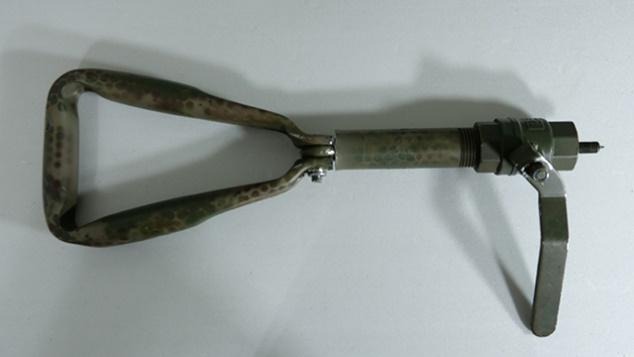
The IAD (Individual Air Defense) is a counter-drone weapon designed to be carried by each soldier on the modern battlefield.
Lightweight, low-cost, and easy to build, it is designed to be assembled from readily available components. Having been developed and tested in Ukraine, it was intentionally designed to use parts available from the home improvement chain Epicentr (Ukraine’s version of Home Depot).
Invented by Sons of Liberty International (SOLI) founder Matthew VanDyke based on his experience with drone warfare in Ukraine, the IAD has been released for free to Ukraine to rapidly begin saving lives in the war against Russia.
Features of The IAD
– Lightweight
– Compact (fits in a tactical pouch)
– Low cost to build
– Quick field assembly
– Made of commonly available, replaceable components
– Uses commonly available ammunition
– Easily modified with accessories and improvements
– Area-effect to neutralize moving drones
– Build cost can be lowered considerably through mass production or alternative sourcing of parts
– Shovel head could be attached to double as a trenching tool
– Training not required
Sons of Liberty International could manufacture and sell the IAD for substantial profit. We have decided instead to release the IAD for free so that Ukrainian soldiers can immediately build their own and use it to save lives on the battlefield.
Our goal is not profit, but saving lives and winning the war against Russia. The time that would be lost by setting up the manufacturing, and sales of the IAD would result in countless lives lost.
We hope that supporters of Ukraine will appreciate this ethical approach and become part of the IAD project by making a donation to Sons of Liberty International.
Your donation will:
– Reward our good work and decision to release the product for free to save lives
– Recover the costs of developing and testing
– Fund other inventions and innovations that we are currently developing for use in Ukraine
-Fund our training, advising, and other work in Ukraine
How to Build the Counter-Drone IAD
The counter-drone IAD was designed to be of simple construction using commonly available parts. This actually made the design process more difficult in some ways, as creative solutions had to be devised using a limited selection of components.
We are providing instructions to build the counter-drone IAD here for free so that Ukrainian soldiers can quickly assemble their own and begin saving lives on the battlefield.
Assembly Instructions
Step One
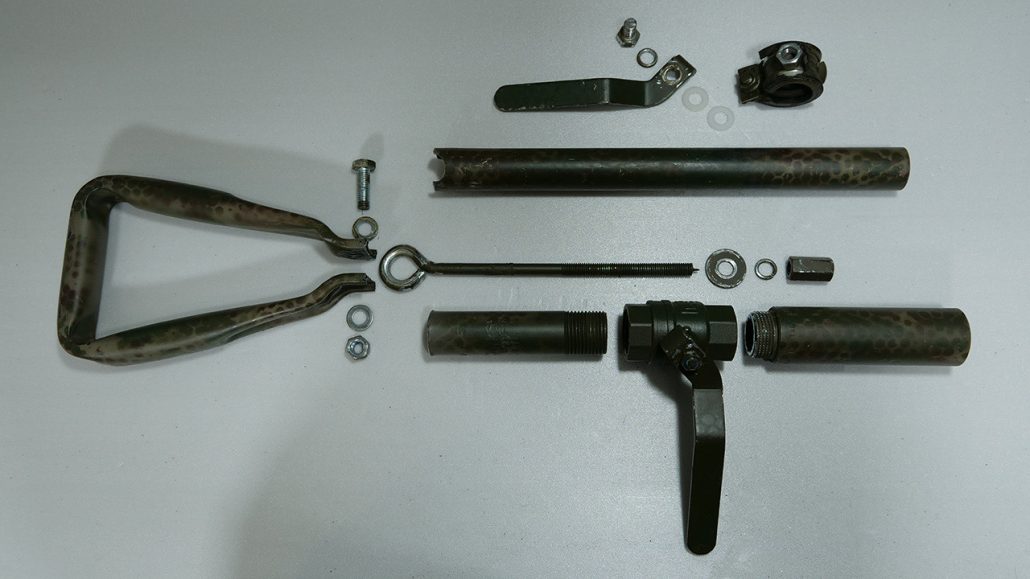
Parts
Purchase the components listed here.
Step Two
The Barrel
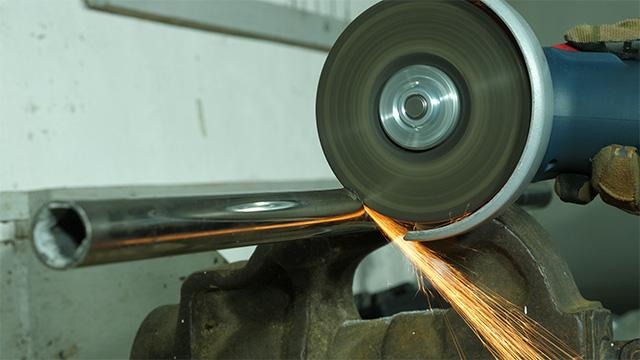
1. Cut a 25mm steel tube to desired length (270 mm or longer is recommended)ти цю сторінку українською мовою)
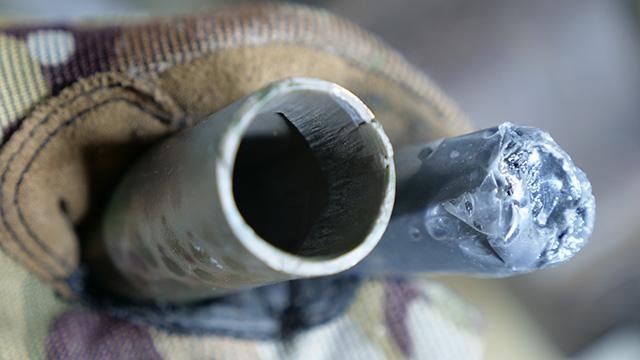
2. Using cold weld epoxy, apply a coating (approximately 1-2mm thick) inside the end of the barrel. This will reduce the inside diameter of the barrel to provide a better grip on the shotgun shell so it doesn’t fall out.
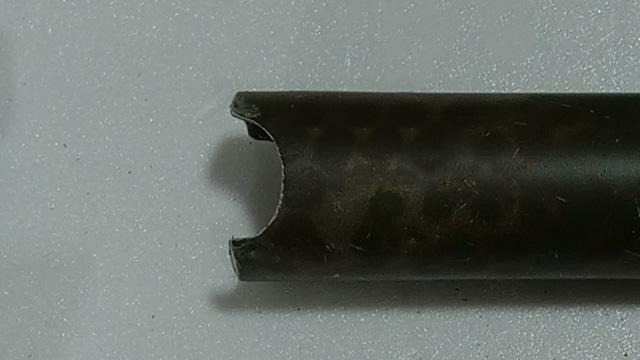
3. After the cold weld epoxy has fully cured, use a round file to create two notches in the barrel. This will make removing the used shotgun shells far easier because they can be gripped through the two notices using the thumb and forefinger.
4. Insert a shotgun shell to test the fitment. It should be easy to insert and remove the shotgun shell, but it should not fall out of the barrel in any position, even when shaken hard. If the fitment is too tight, use a file or sandpaper to remove epoxy until the fitment is correct.
Step Three
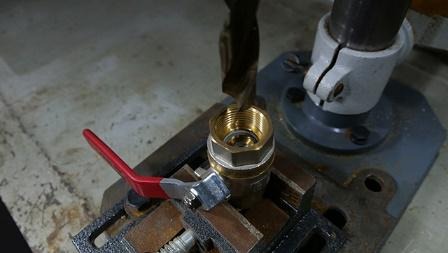
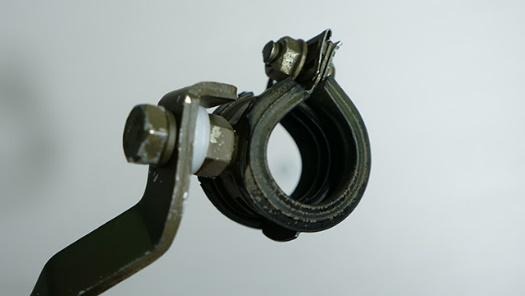
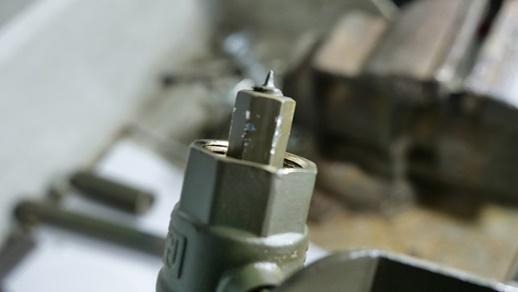
The Firing Chamber
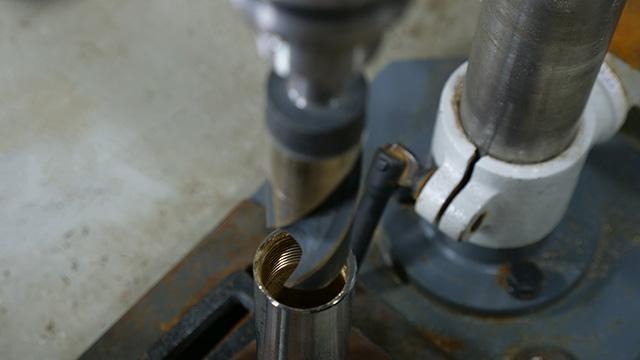
1. Drill the brass pipe extension using a 22mm(?) bit to increase the interior diameter to 22mm(?). Continue drilling until contacting the lower fifth (?) of the pipe extension where the interior diameter narrows.
Step Four
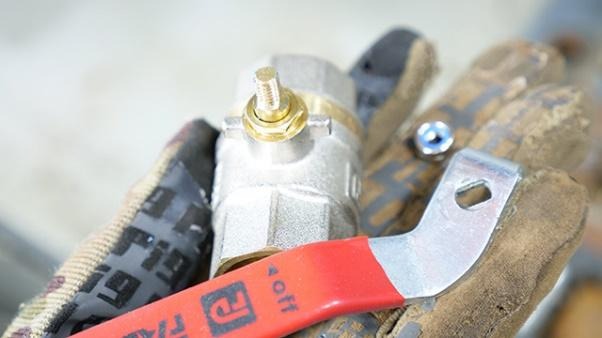
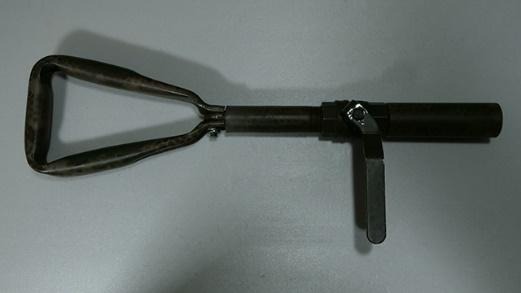
The Grips
The grips are made from the handles of pipe valves. The main grip is a complete pipe valve with handle. The foregrip is a handle removed from a pipe valve and attached to a steel clamp.


Grip
1. Close the valve (so that the inside of the pipe is blocked), and then drill through it so the valve no longer blocks passage through the pipe. This valve and handle will be the grip.

Foregrip
1. Remove the handle from the second valve
2. Enlarge the hole in the handle using a tap to create an M8 threaded hole (recommended), or by drilling with an M8 drill bit
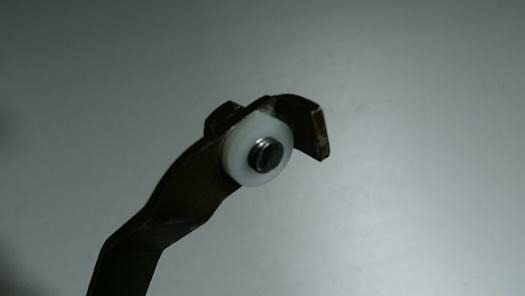
3. Place two M8 polyamide washers between the clamp and the handle, then screw the M8 x 12mm bolt through a lock washer, the handle, and the two M8 polyamide washers, and then into the clamp.
Step Five
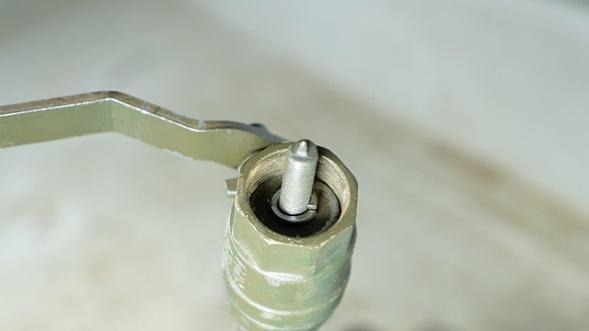
The Firing Pin
The firing pin is made by filing a 160mm x M8 eye bolt.
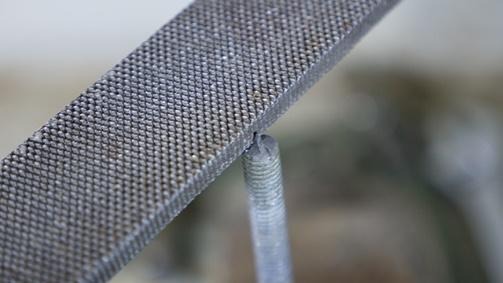
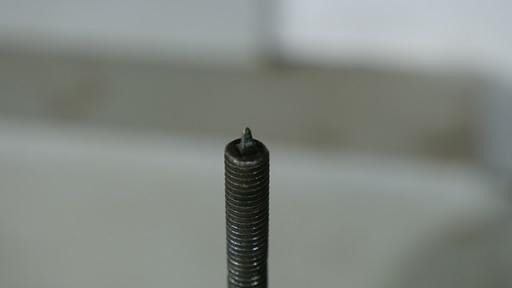
1. Using a metal file, remove material from the end of the M8 x 160mm eye bolt to form a firing pin. The pin should be centered and no more than 5mm in length. Making te pin too long or too thin can cause it to bend or break after firing. Making the pin too thick can cause it to become stuck in the shell casing after firing, making the removal of the empty shell more difficult.
Step Six
The Shoulder Stock
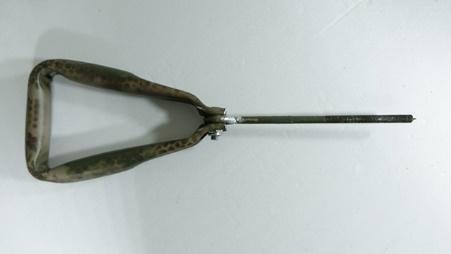
1. The shoulder stock is made from the handle of a folding military shovel.
Note: The model of shovel used in these instructions isn’t available from Epicentr, but can be ordered online from Rozetka or other sellers. See the parts section for details. This model of shovel is preferred because part of it is already 25mm in diameter and threaded to connect to the grip.
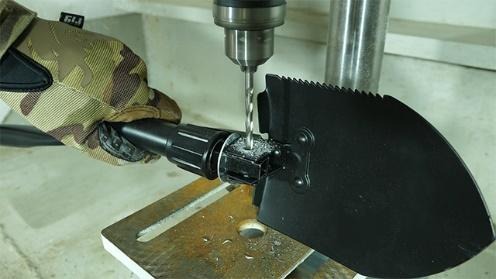

1. Drill out the pin connecting the shovel blade
2. Drill out the pin connecting the shovel handle
3. There will be a spring and metal piece inside of the tube after the blade and handle are removed. Remove the spring and metal piece without damaging the tube or the threads on the tube, and keep the tube and handle.
Step Seven
Installing the fire pen
1. Attach the firing pin to the shoulder stock. Slide the M8 x 25mm bolt through the shoulder stock and eye of the firing pin. Place an M8 flat washer under the head of the bolt, and both an M8 flat washer and an M8 lock washer under the nut. Tighten until the firing pin becomes very difficult to move.
Note: A M8 nylon lock nut can be used for additional reliability and is recommended. When a nylon lock nut is used, the M8 lock washer is not necessary.
Step Eight
Install the Grip and Foregrip
The Grip
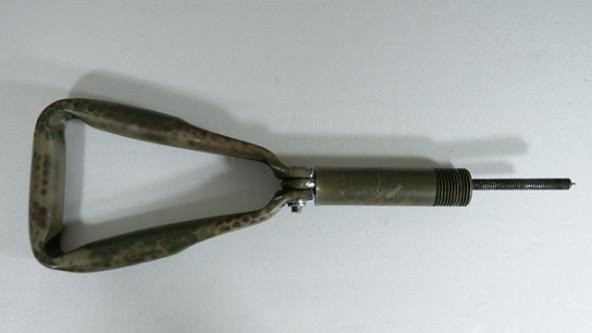
1. Slide the tube that came with the shovel onto the firing pin, with the threaded end away from the shoulder stock.
2. Slide the grip onto the firing pin, screwing it into the shovel tube. For a right-handed shooter, the handle should be on the right side, as seen in the photos. Left-handed shooters can optionally position the handle on the left side.
3. Slide the M8 large flat washer on the firing pin until it lays flush against the interior of the grip. Add an M8 lock washer on top of the M8 large flat washer.

4. Tighten the M8 x 25mm high hex nut onto the firing pin threads until it is tight against the washers. Only the firing pin and a few threads should protrude from the end of the high hex nut. Having too much of the threaded rod extending beyond the nut can cause the empty shell casing to become stuck on the firing pin after firing. If too much of the firing pin extends beyond the high hex nut, add more large flat washers or reduce the length of the firing pin.
The Foregrip
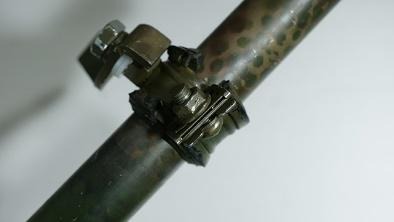
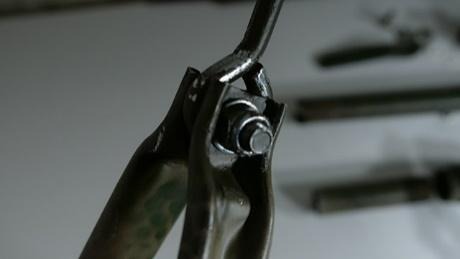
1. Slide the foregrip onto the barrel. Adjust to the desired position and tighten the M6 bolt of the steel clamp. Add a M6 flat washer under the head of the M6 bolt, and M6 nut on the end of the M6 bolt, and tighten more.
Note: It is recommended to replace the Philipps head bolt that comes with the clamp with a M6 hex head bolt so it can be tightened with pliers in the field when necessary. A flange nut or nylon lock nut is recommended to secure it.
Step Nine
Attach the Firing Chamber
1. Screw the firing chamber into the grip
The Individual Air Defense (IAD) counter-drone weapon is now ready for use.
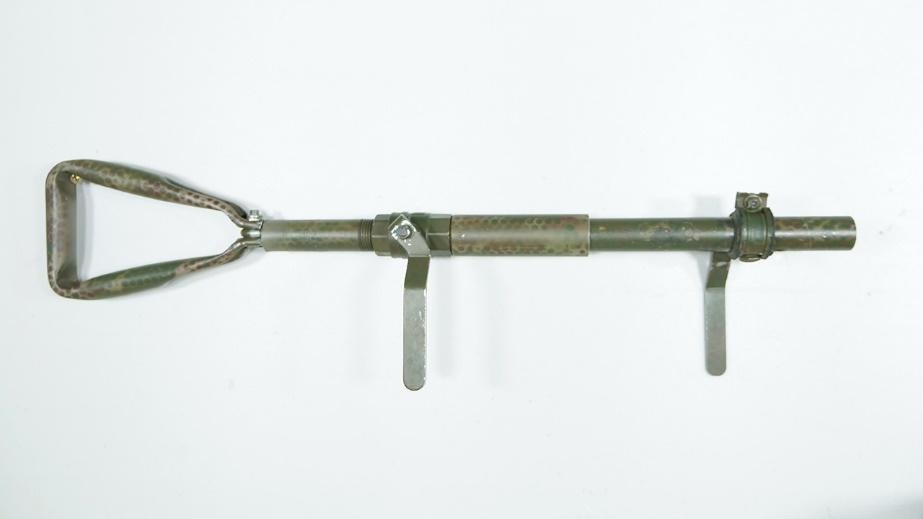
Quick Field Assembly
As seen in the video demonstration of the counter-drone IAD, field assembly can be done very quickly. This allows the IAD to be broken down, stored in a pouch, and then reassembled when needed.
Disassembling the IAD for storage in a pouch is a simple process:
1. Remove the firing chamber
2. Loosen the M8 x 25mm high hex nut until the shoulder stock can be folded
3. Tighten the M8 x 25mm high hex nut by hand so that the folder shoulder stock stays in position
Assembling from a pouch can be done quickly when needed:
1. Loosen the M8 x 25mm high hex nut by hand so that the shoulder stock can be extended
2. Tighten the M8 x 25mm high hex nut by hand so that the should stock stays in the extended position
3. Screw in the firing chamber
Ammunition

The counter-drone IAD uses 12-gauge shotgun shells as ammunition. Rapid dispersion birdshot shells should be used. Ammunition with reduced powder loads and low recoil are highly recommended.
Rapid dispersion birdshot shells with standard powder loads can be used and were used in testing the IAD. The recoil when using standard recoil shell is substantial, however. If using standard recoil shells, it is recommended to add some padding to the shoulder stock or position the shoulder stock against Kevlar shoulder armor when firing. Standard recoil shells can easily produce enough recoil to cause bruising to the arm and shoulder.
Ideally, custom shells will be developed for IADs that feature reduced recoil and a higher load of birdshot in a rapid-dispersion shell.